
티스토리 뷰
Socket을 이용한 HTTP Server
HTTP 통신은 당연히 Socket을 이용하는건데 어떻게 제목이 Socket을 이용한 HTTP Server이다.
이전 게시글
소켓을 활용한 Echo Server 만들기
소켓(Socket) 소켓은 네트워크에서 실행되는 두 프로그램 간의 양방향 통신 링크의 양 끝점을 말한다. 즉, 프로세스가 데이터를 보내거나 받기 위해서는 반드시 소켓을 열어서 소켓에 데이터를 써
oneny.tistory.com
소켓에 대한 개념과 소켓을 통해 에코 콘솔 서버 만든 게시글이다.
HTTP Server 개요
1. Configuration 파일 읽기
프로그램의 설정 정보를 저장하는 파일을 읽어와서 프로그램이 동작할 환경설정을 구성한다. 이 설정은 포트번호, 파일 경로, 데이터베이스 연결 정보 등을 포함할 수 있다.
2. 특정 포트번호에서 소켓 열기
네트워크 연결을 수신하기 위해 특정 포트번호에서 소켓을 연다. 이것은 클라이언트 요청을 수신하고 처리할 준비를 하는 단계이다.
3. 요청 메시지 읽기
클라이언트로부터의 요청 메시지를 읽어와서 해당 요청에 대한 처리를 시작한다. 요청 메시지는 클라이언트가 원하는 작업에 대한 정보를 담은 데이터이다.
4. 파일 시스템에서 파일 열고 읽기
필요한 경우 파일 시스템에서 파일을 열고 읽어온다. 이것은 클라이언트 요청에 대한 데이터나 리소스를 제공하기 위해 사용될 수 있다.
5. 응답 메시지 쓰기
클라이언트에 대한 응답 메시지를 생성하고 전송한다. 이 메시지는 클라이언트의 요청에 따라 생성되며, 처리 결과를 포함할 수 있다.
설정 정보를 위한 클래스 생성
http.json
{
  "port": 8080,
  "webroot": "/tmp"
}
Configuration
public class Configuration {

  private int port;
  private String webroot;

  public int getPort() {
    return port;
  }

  public void setPort(int port) {
    this.port = port;
  }

  public String getWebroot() {
    return webroot;
  }

  public void setWebroot(String webroot) {
    this.webroot = webroot;
  }
}
HTTP 서버의 설정 관리를 담당하는 클래스를 생성한다. Configuration 클래스는 위 http.json 파일과 매핑하여 설정 정보를 가진다.
ConfigurationManager
public class ConfigurationManager {

  private static ConfigurationManager myConfigurationManager;
  private static Configuration myCurrentConfiguration;

  private ConfigurationManager() {}

  public static ConfigurationManager getInstance() {
    if (myConfigurationManager == null) { // 지연 생성
      myConfigurationManager = new ConfigurationManager();
    }

    return myConfigurationManager;
  }

  public void loadConfigurationFile(String filePath) {
    FileReader fileReader = null;
    try {
      fileReader = new FileReader(filePath);
    } catch (FileNotFoundException e) {
      throw new HttpConfigurationException(e);
    }
    StringBuffer sb = new StringBuffer();
    int i;

    try {
      while ((i = fileReader.read()) != -1) {
        sb.append((char) i);
      }
    } catch (IOException e) {
      throw new HttpConfigurationException(e);
    }

    JsonNode conf = null; // JSON 데이터를 JsonNode 객체로 변환
    try {
      conf = Json.parse(sb.toString());
    } catch (JsonProcessingException e) {
      throw new HttpConfigurationException("Error parsing the Configuration File", e);
    }
    try {
      myCurrentConfiguration = Json.fromJson(conf, Configuration.class); // JsonNode를 통해 ConfigurationManager 객체로 생성
    } catch (JsonProcessingException e) {
      throw new HttpConfigurationException("Error parsing the Configuration file, internal", e);
    }
  }

  public Configuration getCurrentConfiguration() {
    if (myCurrentConfiguration == null) {
      throw new HttpConfigurationException("No Current Configuration Set.");
    }

    return myCurrentConfiguration;
  }
}
ConfigurationManager는 싱글톤 패턴을 사용하여 여러 곳에서 공유되어 설정을 일관되게 관리하도록 구현했다. ConfigurationManager의 loadConfigurationFile() 메서드는 지정된 파일 경로에 대한 설정 파일(http.json)을 로드하여 Configuration 객체로 파싱 및 변환하는 역할을 한다.
설정 정보를 가지고 Socket을 사용하여 HTTP Server 만들기
public class HttpServer {

  private final static Logger LOGGER = LoggerFactory.getLogger(HttpServer.class);

  public static void main(String[] args) {

    LOGGER.info("Server starting...");
    ConfigurationManager.getInstance().loadConfigurationFile("src/main/resources/http.json");
    Configuration conf = ConfigurationManager.getInstance().getCurrentConfiguration();

    LOGGER.info("Using Port: " + conf.getPort());
    LOGGER.info("Using WebRoot: " + conf.getWebroot());

    try {
      ServerListenerThread serverListenerThread = new ServerListenerThread(conf.getPort(), conf.getWebroot());
      serverListenerThread.start();
    } catch (IOException e) {
      e.printStackTrace();
      // TODO handle later.
    }
  }
}
서버의 진입점인 HttpServer의 main() 메서드에서 위에서 만든 Configuration 클래스와 ConfigurationManager 클래스를 통해 Thread를 상속받은 ServerListenerThread를 시작하는 것을 확인할 수 있다. 그러면 Thread를 상속받은 ServerListenerThread 클래스를 살펴보자.
소켓을 사용하는 Thread 클래스 생성
싱글스레드로 동작하는 ServerListenerThread
public class ServerListenerThread extends Thread {

  private final static Logger LOGGER = LoggerFactory.getLogger(ServerListenerThread.class);
  private final ServerSocket serverSocket;
  private int port;
  private String webroot;

  public ServerListenerThread(int port, String webroot) throws IOException {
    this.port = port;
    this.webroot = webroot;
    // 이미 포트 번호가 사용되거나 포트를 사용할 권한 없는 등의 이유로 IOException이 발생할 수 있음
    serverSocket = new ServerSocket(this.port);
  }

  @Override
  public void run() {

    try (serverSocket) {
      while (serverSocket.isBound() && !serverSocket.isClosed()) {
        Socket socket = serverSocket.accept();
        LOGGER.info(" * Connection accepted: " + socket.getInetAddress());

        try (socket;
             InputStream inputStream = socket.getInputStream();
             OutputStream outputStream = socket.getOutputStream()) {

          int oneInt = -1;
          while ((oneInt = inputStream.read()) != -1) {
            LOGGER.info((char)oneInt);
          }

          String html = "<html><head><title>Simple Java HTTP Server</title></head><body><h1>This page was served using my Simple Java HTTP Server</h1></body></html>";

          final String CRLF = "\n\r"; // 13, 10

          String response =
                  "HTTP/1.1 200 OK" + CRLF + // Status Line  :  HTTP VERSION RESPONSE_CODE RESPONSE_MESSAGE
                          "Content-Length: " + html.getBytes().length + CRLF + // HEADER
                          CRLF +
                          html +
                          CRLF + CRLF;

          try {
            sleep(5000);
          } catch (InterruptedException e) {
            throw new RuntimeException(e);
          }

          outputStream.write(response.getBytes());

          LOGGER.info(" * Connection Processing Finished.");
        } catch (IOException e) {
          LOGGER.error("Problem with communication", e);
        }
      }
    } catch (IOException e) {
      LOGGER.error("Problem with setting socket", e);
    }
  }
}
위 클래스는 싱글 스레드에서 클라이언트의 요청이 들어오면 accept() 메서드를 통해 소켓이 연결되고, OutputStream을 통해 응답을 하는 것을 확인할 수 있다.
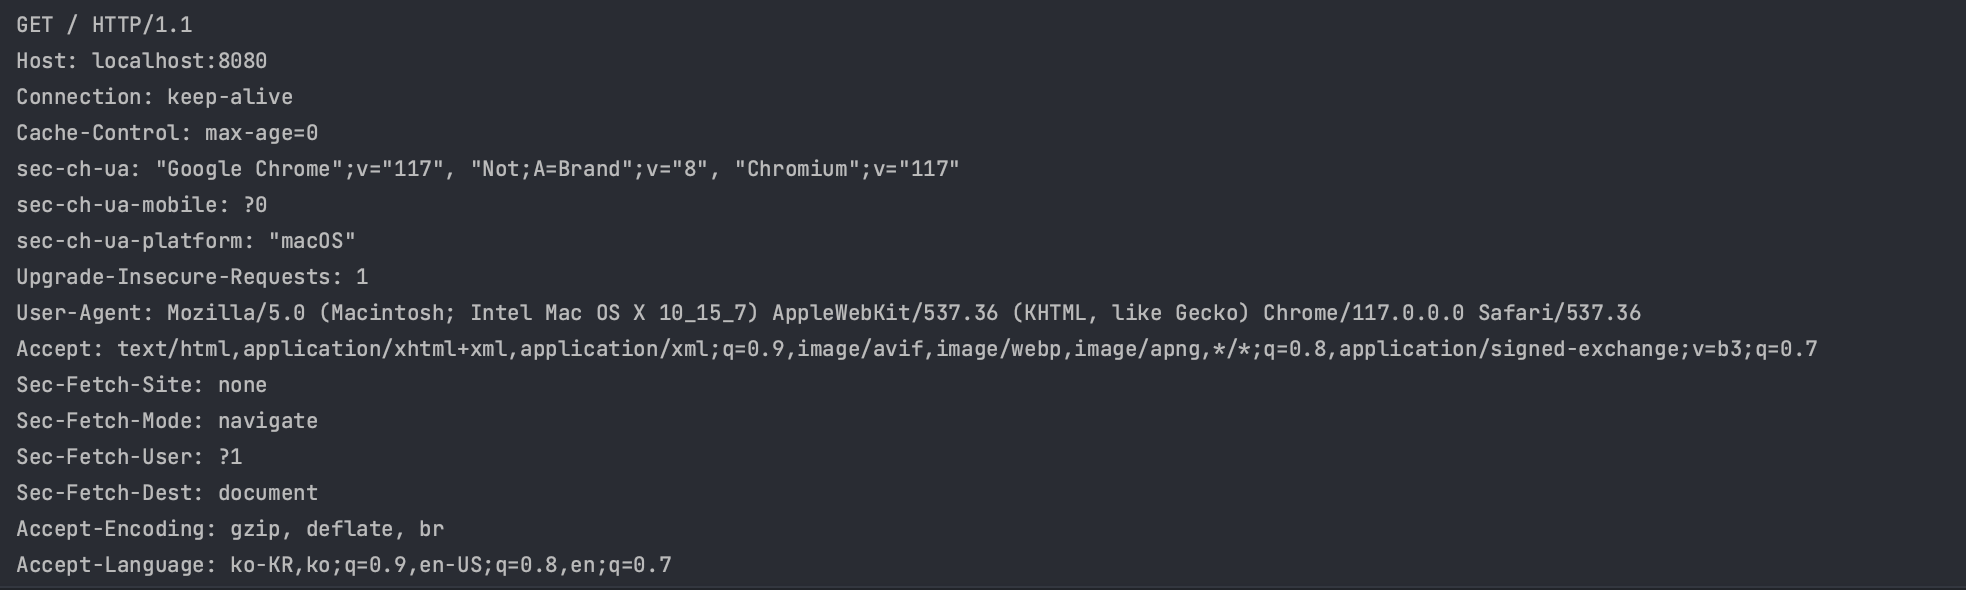
브라우저로 'http://localhost:8000'을 호출하면 웹 브라우저가 8000번 포트로 HTTP 요청을 보낼 것이고, 콘솔에 위와 같은 HTTP GET 요청 내용을 확인할 수 있다. InputStream의 read 메서드가 -1을 반환하면 종료한다. InputStream의 read 메서드는 스트림의 끝에 다다를 경우, 즉 소켓에서 얻은 스트림의 연결이 끊어질 경우에 -1을 반환한다.
직접 HTTP Response의 Status Line과 Headers와 함께 Message Body까지 보내는 것을 확인할 수 있다. HTTP Response에서 주목할 점은 Content-Length 헤더의 값을 Message Body의 크기를 응답으로 생성할 때 결정한다는 것이다.
싱글 스레드 문제

싱글스레드에서 무거운 작업이 돌아가게 되면 어떻게 될까? 위에서 Sleep(5000);를 통해 잠시 스레드를 TIMED_WAITING 상태로 만들고나서 응답을 하도록 작성했다. 그리고 위 결과를 보면 한 번에 7개의 요청이 들어왔을때, 하나의 스레드가 완료되고 난 후 ServerSocket의 대기 중인 큐에서 꺼내져 다음 소켓이 연결되어 작업이 수행되기 때문에 대략 35초 이상의 시간이 소요된 것을 확인할 수 있다. 이를 해결하기 위해서는 어떻게 해야할까?
작업 스레드(HttpConnectionWorkerThread) 생성
public class HttpConnectionWorkerThread extends Thread {

  private final static Logger LOGGER = LoggerFactory.getLogger(HttpConnectionWorkerThread.class);
  private final Socket socket;

  public HttpConnectionWorkerThread(Socket socket) {
    this.socket = socket;
  }

  @Override
  public void run() {
    try (socket;
         InputStream inputStream = socket.getInputStream();
         OutputStream outputStream = socket.getOutputStream()) {

      String html = "<html><head><title>Simple Java HTTP Server</title></head><body><h1>This page was served using my Simple Java HTTP Server</h1></body></html>";

      final String CRLF = "\n\r"; // 13, 10

      String response =
              "HTTP/1.1 200 OK" + CRLF + // Status Line  :  HTTP VERSION RESPONSE_CODE RESPONSE_MESSAGE
                      "Content-Length: " + html.getBytes().length + CRLF + // HEADER
                      CRLF +
                      html +
                      CRLF + CRLF;

      outputStream.write(response.getBytes());

      try {
        sleep(5000);
      } catch (InterruptedException e) {
        throw new RuntimeException(e);
      }

      LOGGER.info(" * Connection Processing Finished.");
    } catch (IOException e) {
      LOGGER.error("Problem with communication", e);
    }
  }
}
요청을 받는 스레드와 작업을 수행해서 반환하는 작업스레드를 따로 분리했다. 기존의 ServerListenerThread에 연결된 소켓을 넘겨받아 해당 연결된 소켓을 통해 클라이언트와 통신하는 것을 확인할 수 있다. 그러면 ServerListenerThread에서는 클라이언트와의 소켓 연결되는 작업만 수행하고, 소켓을 넘겨주면서 작업을 위한 별도의 스레드를 두고 종료가 된다. 별도의 스레드는 클라이언트 각각의 요청마다 생성되기 때문에 병렬처리를 보장하여 응답 속도를 향상시킬 수 있다.
ServerListenerThread 수정
public class ServerListenerThread extends Thread {

  private final static Logger LOGGER = LoggerFactory.getLogger(ServerListenerThread.class);
  private final ServerSocket serverSocket;
  private int port;
  private String webroot;

  public ServerListenerThread(int port, String webroot) throws IOException {
    this.port = port;
    this.webroot = webroot;
    // 이미 포트 번호가 사용되거나 포트를 사용할 권한 없는 등의 이유로 IOException이 발생할 수 있음
    serverSocket = new ServerSocket(this.port);
  }

  @Override
  public void run() {

    try (serverSocket) {
      while (serverSocket.isBound() && !serverSocket.isClosed()) {
        Socket socket = serverSocket.accept();
        LOGGER.info(" * Connection accepted: " + socket.getInetAddress());

        HttpConnectionWorkerThread workerThread = new HttpConnectionWorkerThread(socket);
        workerThread.start();
      }
    } catch (IOException e) {
      LOGGER.error("Problem with setting socket", e);
    }
  }
}
HttpConnectionWorkerThread의 역할 및 장점
1. 병렬 처리
ServerListenerThread는 클라이언트의 연결 요청을 수신하고 각 연결을 HttpConnectionWorkerThread 객체로 위임한다. 이렇게 멀티스레드 구조를 지원함으로써 여러 클라이언트의 요청을 동시에 처리할 수 있다.
2. 요청 처리 분리
HttpConnectionWorkerThread는 개별 클라이언트 연결을 처리하는 역할을 담당한다. 이로써 서버의 핵심 로직과 클라이언트와의 통신 로직을 분리할 수 있어 유지보수를 용이하게 할 수 있따.
3. 응답 시간 향상
HttpConnectionWorkerThread는 하나의 클라이언트 연결을 담당하며, 해당 클라이언트에게 응답을 보내는 역할을 한다. 위에서 봤듯이 하나의 스레드에서 처리한다면 클라이언트의 연결 처리가 지연될 수 있지만 HttpConnectionWorkerThread를 사용하여 클라이언트는 별도의 스레드에서 처리되므로, 응답 시간을 향상시킬 수 있다.
전체 코드를 보려면 아래 깃헙 주소를 가면 된다.
GitHub - oneny/http-server
Contribute to oneny/http-server development by creating an account on GitHub.
github.com
'Java > Java' 카테고리의 다른 글
| Reactive Streams와 Reactor (0) | 2025.04.10 |
|---|---|
| HTTP Request 파싱하기 (0) | 2023.09.21 |
| Spring MVC와 Spring WebFlux로 알아보는 Blocking I/O vs Non-blocking I/O (0) | 2023.09.05 |
| Deadlock 상황 만들어 VisualVM으로 분석하고, 해결하기 (0) | 2023.09.03 |
| 소켓을 활용한 Echo Server 만들기 (0) | 2023.09.01 |
- Total
- Today
- Yesterday
- postgresql
- mdcfilter
- 구름톤 챌린지
- transaction
- 넥스트스탭
- 구름톤챌린지
- nginx configuration
- 카프카
- 비관적 락
- socket
- Synchronized
- Redisson
- 낙관적 락
- mysql
- jvm 메모리 구조
- annotation
- Kafka
- EKS
- sql
- 람다
- TDD
- spring session
- 트랜잭션
- Java
- pessimistic lock
- NeXTSTEP
- spring webflux
- redis session
- 분산 락
- nginx
| 일 | 월 | 화 | 수 | 목 | 금 | 토 |
|---|---|---|---|---|---|---|
| 1 | 2 | 3 | 4 | |||
| 5 | 6 | 7 | 8 | 9 | 10 | 11 |
| 12 | 13 | 14 | 15 | 16 | 17 | 18 |
| 19 | 20 | 21 | 22 | 23 | 24 | 25 |
| 26 | 27 | 28 | 29 | 30 |